Summary: This is a guide providing 2 ways to screen record your Windows 10 computer with audio coming from system or microphone. Thus you can create a more engaging capture at will. Your screen capture is going to be lifeless if there’s no original sound or any voiceover. And in most cases, it’s necessary to do screen recording with sound.
For personal guidance or teaching video production, it’s more convenient to do real-time explanation than dubbing afterward. But for various reasons, your final screen recording may have no sound as you expect. Nobody wants to create or enjoy a battle royal gameplay recording without a dread yell sound, a training video with no background explanation, or a muted streaming recording with clownish movements… So here in this article, we will come to the topic of how to screen record on a Windows PC with audio. The sound source may come from the system itself, a browser, an application, or the external microphone. To begin with, since the Windows system has a screen recording application off the rack, we will give a place for it as the first way. And the other way falls on recording with a solid third-party screen and audio recorder.
Table of Contents
How to Screen Record on Windows 10 with Audio More Flexibly
Pros: Record whatever screen actions with sound at will; Flexible output settings; Effects and edits available It would be much more convenient to do recording with a handy screen and audio recorder. Certainly, there are some freeware to standby, but honestly, they are more suitable for those old soldiers or recruits who are willing to take time to tinker around the complicated stuff. If you are not the one, a cheap and commercial recorder is your top choice. RecMaster, as one of the best video capture software for Windows, is lightweight but powerful. With five recording modes built-in and various advanced settings, it enables you to record on-screen actions at your disposal. No more words, let’s just check how to use RecMaster to screen record with audio on PC.
Step 1. Download, install, and open RecMaster
Free DOWNLOAD the RecMaster’s exe package here and do the installation then. After that, launch it to go ahead.
Step 2. Choose capture mode and audio sources
Select one mode according to your actual need from the main interface. For example, if you plan to record gameplay then hit the Game Mode, the whole desktop hit the Full Screen, a specific region hit the Custom, your front camera hit the Webcam.
After that, select the audio source to record. Just click your mouse to decide whether to turn on the system sound, and microphone and adjust the volume. Also, you are free to set video format, resolution, and frame rate here. If you are using dual monitors, RecMaster permits you to do selection, too. By clicking the left bottom Settings icon, you can define your mouse effects, watermark, and hotkeys according to your habits.
Step 3. Start Recording
When preparation is done, tap the red round button to begin the recording. During the recording, you are optional to make some annotations with the drawing board tool. When you end the recording, just preview from the recording list and RecMaster allows you to cut the recording or upload it online in one click. Note that the RecMaster full version has no limit on recording length and empowers users to schedule recording. See also: How to Record Screen with Narration on Windows and Mac
Way 2: How to Screen Record with Sound on Windows 10 Without Software Download
Pros: No software downloads; Record most programs and games alone with audio Cons: Limited recording capability / Unable to record webcam, desktop, file explorer, and complicated operations Windows 10 introduces a new Game Bar feature for gamers to capture gameplay. And it can also be taken as one of the best screen recorder for Windows to record general programs’ operations. So let’s just go ahead to take a look at how to record the Windows 10 with audio with it.
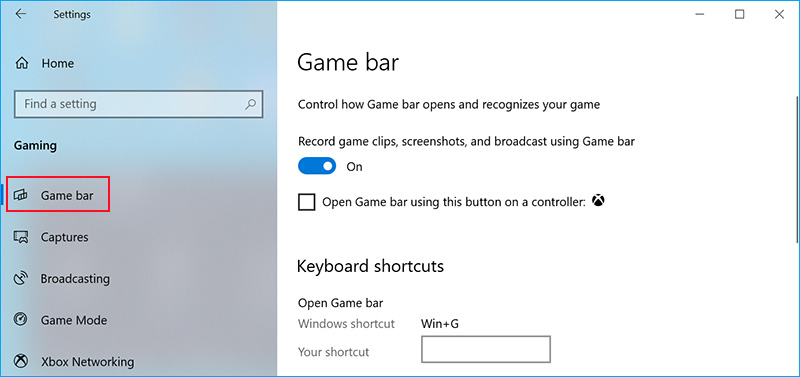
Step 1. Go to Settings from the start menu and navigate to the Gaming window.
Make sure the Game bar option “Record game clips, screenshots, and broadcast using Game bar” is turned on. Here you can also do some other settings regarding capture, such as keyboard shortcuts, saving folder of game clips, maximum recording length, video and audio quality, video frame rate, and sound volume. When you finish those preparations, just close the windows to move on.

Step 2. Press the shortcut “Win + G”
If you didn’t change it in Step 1, you can pop Game Bar up.
Step 3. Click to open the Settings windows
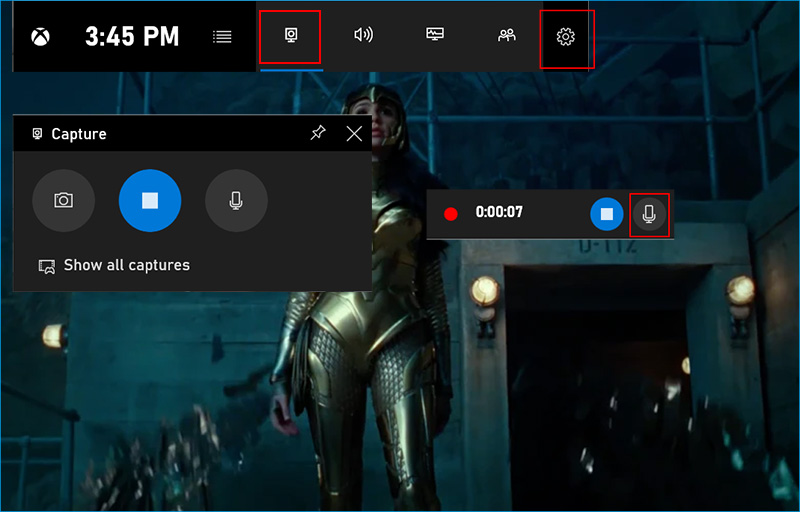
You can define what audio to record under Capturing: Game (Game + enabled mic) or All (Game, enabled mic, apps, system)
Step 4. Display another dedicated panel
After setting what audio to record, press the leftmost Capture button to display another dedicated panel.

Step 5. Start recording
Tap the third “Start recording” button or use hotkeys “Win + Alt + R” to begin the capture. Be aware that you can take an overall control of when to turn on or off the microphone sound with “Win + Alt + M”.
Step 6. Stop recording
Stop the recording by clicking the blue button showing on the floating bar or shortcuts “Win + Alt + R”. Then open and preview the video from the Game bar directly. It’s fairly simple to record games or programs with the Game Bar by taking the mic or system sound in.
The drawback is that Game Bar does not support recording Windows desktop, file explorer, or activities involving more than one program. That’s to say, basic screencasting for a single task is OK while any advanced recording may take your time to find some Game bar alternative.
Conclusion
A good screen recording idea and plan is just the beginning. A solid screen and audio recorder can make things easier. You don’t have to waste your time creating more problems with an advanced complex tool, because the ones we’ve mentioned here are already optimal choices.
Related Article: 4 Best Screen and Voice Recorders

RecMaster
Screen recording made easy.
Record every moment on your PC or Mac within few clicks.
Download Download-
How to Screen Record Final Fantasy 7 Rebirth On PC?
-
How to Record Signal Calls on Windows and Mac?
-
How to Record Screen on Gateway Desktop?
-
How to Record Webcam in 9:16 Aspect Ratio on PC?
-
How to Screen Record Flash Games?
-
How Do I Record in 1080 x 1920 Dimensions on PC?
-
Can I Record a Meeting While Wearing Headphones on Computer?
-
Deleted the Wrong Video
-
How to Set Passwords for RecMaster with My Lockbox?
-
How to Screen Record on an ASUS VivoBook Laptop?
-
How to Record Black Myth: Wukong?
-
How to Record Filmzie on PC and Mac?
-
How to Create New Employee Onboarding Videos with RecMaster?
-
How to Make A Product Demo Video with A Screen Recorder

RecMaster – Record Every Moment on Your Computer Screen
Record 1080p or even 4K clips at 60fps to maintain the high quality still.
Flexible settings for mouse cursor effects, watermark and annotations.
Preloaded with recording scheduler, video editor. Allow one-click sharing.
Related & Hot Articles
Subscribe to keep up with the latest software discounts , news, and updates.


