The best known of the Microsoft PowerPoint alternatives is none other than Google Slides. People today have more demands than ever to record PowerPoint slides with audio. And this passage introduces the step-by-step tutorial to Record Google slides.
For many of us, Microsoft PowerPoint is definitely the first choice for business communications. With PPT, different purposes could be achieved with ease. Presentations, monthly reports, training materials, status reports and virtually any kind of form of knowledge sharing in today’s world brings about in PowerPoint. This phenomenon has good reasons to cite for — its easy-to-use attribute, a deck combines all kinds of texts, pictures, structures, etc.
However, PPT’s advantages over other office software will not likely last forever. As the “slideshow” has emerged as a key business tool, competitors are springing out urgently showing themselves to be otherwise choices other than Microsoft PowerPoint by dint of offering better, cheaper, or more social ways of sharing knowledge. Google Slides is the protagonist of this passage. Now let’s get straight to the tutorial to do PowerPoint screen recording in a Google slides way.
Use Google Slides to Make PowerPoint Files, What’s Advantage of It?
Google Slides’ working mechanism is similar to PowerPoint. Basically, it allows users to create slide-based presentations with a combination of edited text and images.
One of Google Slides’ most valuable features is its collaborative capabilities. This feature lets multiple users work in the same Google Slides file simultaneously, unbelievably in real-time. Google Slides even overcomes the obstacles of version control issues, maintaining running access to the current version of a presentation while also enabling users to view the document’s complete revision history. What’s more, users can access the files and collaboration information on the go, with Google’s mobile Slides apps.
As businesses seek more effective and evolutionary approaches to help teams collaborate as integrity to get work done, solutions like Google’s Slides’ functionality become an optimum choice for users.
Record Google Slides – Using An Easy and Straightforward Tool
Just like its previous experience in recording PowerPoint slides as videos, RecMaster also produces premium videos out of Google slides that involve clear talking-head narrations and system sounds.
As one of the most powerful screen recorder on the market, RecMaster is competent at recording any on-screen activities capturing the slightest sounds and movements. Use RecMaster to record Google slides is a wise decision since this software bears bountiful features for further beautifying your recordings. About this point, I will expand later.
Here are some preparation workflows you need to beware of for recording Google slides.
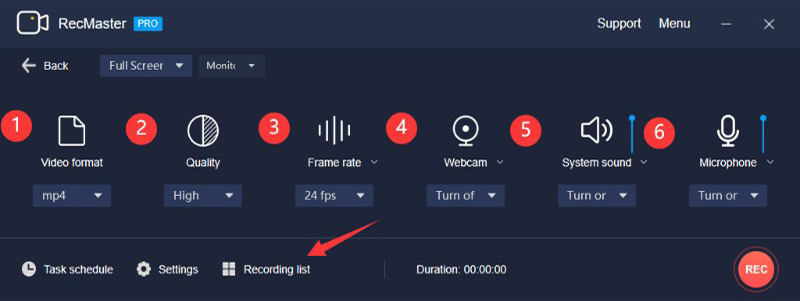
Before recording, RecMaster allows its users to tweak configurations for the best performance of videos. The options include video format, quality, recording mode, etc.
During recording, RecMaster allows users to add bountiful annotation tools, add a webcam to Slides videos for better illustration.
After recording, Users could process their videos with a simple editing feature. Then they can upload the video on the Internet.
Steps:
1. Download and install RecMaster.
2. Open your Google slides files in advance as preparation.
3. Activate RecMaster. Click Full-Screen Mode and then jump to its setting interface.

4. The overlay of the setting panel is the place where you can tweak details of setting options. From the picture below you could see all the options including video formats, video quality, and so on. Here I will show you how to make the best conditions for your Google Slides videos. Choose Original Quality > 30 fps > turn on Webcam > turn on System Sound > Turn on Microphone if you want to add an oral demonstration to your video.
5. Hit the red button “REC” to record. In the floating bar, you can use annotation tools to embellish your footage. Some tools like brushes and pencils to highlight the content of your PPT for presentation. Also, your webcam shot will show up at the down-right corner of your screen, talk to your screen as if you are giving a video presentation.
6. Hit the red button to stop recording. Recording List is the place where all your footages are saved at. You can have access to editors here by clicking the “little scissor” where you can cut unwanted fragments and make the remaining part better integrity.
Final Words
This passage is an all-around tutorial to record Google slides. With a third-party screen recorder – RecMaster’s help, users can produce exquisite videos made of all kinds of Google slides. Hope you get inspired by the instruction above and successfully create your own Google slides videos.

RecMaster
Screen recording made easy.
Record every moment on your PC or Mac within few clicks.
Download Download-
How to Screen Record Final Fantasy 7 Rebirth On PC?
-
How to Record Signal Calls on Windows and Mac?
-
How to Record Screen on Gateway Desktop?
-
How to Record Webcam in 9:16 Aspect Ratio on PC?
-
How to Screen Record Flash Games?
-
How Do I Record in 1080 x 1920 Dimensions on PC?
-
Can I Record a Meeting While Wearing Headphones on Computer?
-
Deleted the Wrong Video
-
How to Set Passwords for RecMaster with My Lockbox?
-
How to Screen Record on an ASUS VivoBook Laptop?
-
How to Record Black Myth: Wukong?
-
How to Record Filmzie on PC and Mac?
-
How to Create New Employee Onboarding Videos with RecMaster?
-
How to Make A Product Demo Video with A Screen Recorder

RecMaster – Record Every Moment on Your Computer Screen
Record 1080p or even 4K clips at 60fps to maintain the high quality still.
Flexible settings for mouse cursor effects, watermark and annotations.
Preloaded with recording scheduler, video editor. Allow one-click sharing.
Related & Hot Articles
Subscribe to keep up with the latest software discounts , news, and updates.


