Browser tab is the most-frequently leveraged media to cybercitizens for making contacts with the Internet World. Nowadays the most welcomed browsers are Google Chrome, Safari, Microsoft Edge, and Firefox. Different browsers offer its users different features, and some are powerful enough to provide users with all kinds of extensions such as Google Chrome. A browser screen recorder is one of the many apps that users may find useful.
This kind of tool is distinct from the desktop screen recorder. It is easy to come by, simple to operate and it causes literally no memory burden. The deficiencies of this kind of tool are evident, though. You cannot use website video recorders if you don’t have internet. A similar problem could be the file loss dues to the sudden breakdown of the Internet.
So to prevent this problem from happening, third-party screen recorders are always helpful.
Third-Party Video Recorder Recommendation
Desktop recording software – RecMaster succeeds to provide more powerful functions than web-launched screen recorders. It is stronger in that it captures any desktop activities effortlessly, and produces all types of videos including gameplay videos, audio files, online meeting videos, etc.
Once you download and install this software, you can use it to record your screen when there is no Internet connection. Here are the download buttons for Windows and Mac.
Browser Screen Recorder – Chrome-Based Screencastify
According to the statistics obtained from Chrome’s web store, Screencastify is the most tried Chrome extension in the field of screen recorders. There are 3 reasons to cite for its popularity. First and foremost, Screencastify enables users to record any streaming videos from the Internet, be they from YouTube, Twitch, or other video portal websites. The second season is that Screencastify offers users more than basic recording features. It provides users with a simple editor to cut their footage. Thirdly, this website recording tool supports the share to YouTube or Google Drive directly from this app.
To use this recorder, a Google account, 1 GB disc memory could be qualified as sufficient preparations.
Recording YouTube streaming videos and audios
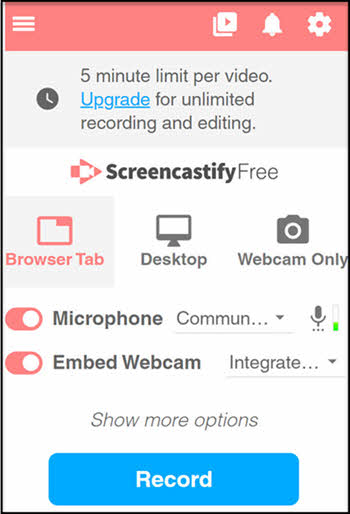
Screencastify basically has two recording modes to capture screen, they are Desktop Mode and Browser Tap Mode. As their names suggest, Desktop Mode is for recording on-screen activities. And Browser Tap Mode is for capturing browser tabs.
But one disappointing flaw of this tool is that it charges money for its editing feature.
Here are steps of using Screencastify to record YouTube streaming videos.
1. The premise to use Screencastify is to add Screencastify to your chrome extensions. Once you find it from the Google Chrome store, click its icon to activate it.
2. In the picture below you could notice the 3 recording modes. And some simple options for webcam and audio resources. Tweak them according to your inclination and pick one mode.

3. Open your target YouTube streaming video, play it in advance and switch to Screencastify and start recording.
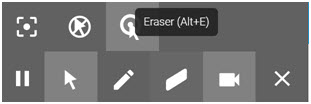
4. During the recording process, users are offered annotation tools to make their videos full of changes. This toolbar lies in the bottom-left corner.

5. To stop recording, you need to press the pause button on the toolbar. This button is quite hard to find, I spend a short time distinguishing it out from the other buttons.
6. Then a window of Screencastify’s editor will immediately show up leading you to its editor.
You can use the editor to cut your YouTube videos there, but if you want an enhanced version of this editor, you need to pay for a license to unlock this additional feature.
Merits:
- Built-in editor for users.
- Bountiful annotative tools.
- Allow users to record videos with a webcam.
- Multiple exporting formats: MP4, MP3, or animated GIF.
- Screencastify’s free version supports only 5 minutes of recording length.
- Immature editing feature.
- Fewer options for setting parameters.
- Simple operations.
- Clear guidance is provided from Apowersoft’s official website.
- Uncluttered and intuitive interfaces.
- Apowersoft’s free version still offers many features.
- It needs a launcher to support all your subsequent operations.
- It needs a paid license to unlock further features of the editor. However, the license could cost you nearly 70 dollars’ charge for a lifetime and it is quite expensive compared with other online screen recorders.
- Apowersoft fails to serve users in an off-line environment.
Flaws:
Browser Screen Recorder – Web Video Recorder Apowersoft
Apowersoft is a handy web screen recorder. As its name suggests, it is really powerful in considering that it requires none extra plug-in or subscription.
What’ even better about this web-launched recorder is that it supports direct upload to the cloud. Besides, as a leading feature of this web video recorder, Apowersoft focuses on delivering users with smooth experience on screen recording.
Here are the steps of using Apowersoft to record your screen:
1. Go to Apowersoft’s official website and hit the button – REC to Record. After that, a launcher will be instantly installed on your PC. This process, however, will take some time.
2. Then a control bar will jump out. Apowersoft offers Full-Screen Mode, Region Mode for users to record screen.

3. Click Full-Screen mode to start recording.
4. While you are recording your screen, you can use Apowersoft’s annotation bar to add texts, graphics, and arrows to your videos.

5. Now it’s time to stop recording. Save your video locally or upload it onto the cloud and your masterpieces are created successfully.
Merits:
Flaws:
Final Words
This passage gives a short introduction to 2 kinds of browser screen recorder – Apowersoft and Screencastify. Browser recorders are convenient, but the biggest problem to them is that they are not as stable as desktop recorder. So if you have higher requirements over recording performance, I suggest you try RecMaster.

RecMaster
Screen recording made easy.
Record every moment on your PC or Mac within few clicks.
Download Download-
How to Screen Record Final Fantasy 7 Rebirth On PC?
-
How to Record Signal Calls on Windows and Mac?
-
How to Record Screen on Gateway Desktop?
-
How to Record Webcam in 9:16 Aspect Ratio on PC?
-
How to Screen Record Flash Games?
-
How Do I Record in 1080 x 1920 Dimensions on PC?
-
Can I Record a Meeting While Wearing Headphones on Computer?
-
Deleted the Wrong Video
-
How to Set Passwords for RecMaster with My Lockbox?
-
How to Screen Record on an ASUS VivoBook Laptop?
-
How to Record Black Myth: Wukong?
-
How to Record Filmzie on PC and Mac?
-
How to Create New Employee Onboarding Videos with RecMaster?
-
How to Make A Product Demo Video with A Screen Recorder

RecMaster – Record Every Moment on Your Computer Screen
Record 1080p or even 4K clips at 60fps to maintain the high quality still.
Flexible settings for mouse cursor effects, watermark and annotations.
Preloaded with recording scheduler, video editor. Allow one-click sharing.
Related & Hot Articles
Subscribe to keep up with the latest software discounts , news, and updates.


