Summary: Maybe you’ve installed VLC on your computer for years, but only take it as a common media player? Well, this tutorial we present today will tell you how to use VLC TO record your Windows desktop. Since many green hands may encounter some VLC capture problems or questions, some most common errors and related fixing tips are also shared.
Not sure about you guys, but for me (with several years’ using experience of VLC), VLC is just an item that I can only make connection with media playing, downloading and streaming. Until recently, I happened to find VLC’s another hidden but useful functionality – screen recording. It’s convenient to capture Windows screen with VLC. Better still, VLC could record and convert the raw footage to mainstream video formats like MP4 and AVI with different encoding methods at one go. It really saves much time, because you don’t need to find some other video converter (if you didn’t have one) to transform video format to another one.
So, if you are a VLC user and want to do screen capture with it, follow this detailed guide to master the skill fast.
Main Content at a Glance:
Part One – VLC Screen Record Guide for Windows
Part Two – Best VLC Alternative to Capture As an Expert
Part Three – Tips and Tricks on VLC Capture Device
Part One: How to Screen Capture Windows 10 Screen with VLC [in 4 Steps]
Step 1. Open Screen Capture Control (Optional)
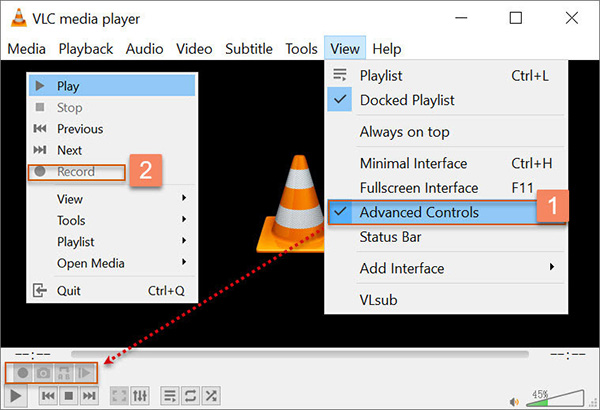
There are two ways to show recording control:
● Go to View drop-down list and tick the “Advanced Controls” option. Thus the recording buttons will appear on the playing controls.
● Right click the mouse and in the control panel, you can see “Record” option in the list.
Therefore, it’s totally up to you whether you enable the recording control in the bottom of player. You may notice that the recording related buttons are all grayed out now. They are absolutely functional after you make your recording settings.
Step 2. Open Capture Device
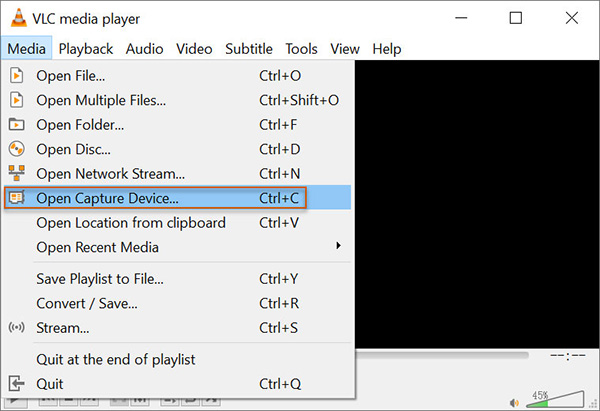
Click on the leftmost Media option on the top menu and choose “Open Capture Device” to pop up a smaller window (Ctrl + C is an alternative operation).
Step 3. Set for Recording
Here select a capture mode under “Capture Device” according to your need. For example, if you want to capture a webcam video on Windows 10, choose DirectShow. If your goal is to create a instructive tutorial from desktop screen, choose Desktop. Here we take recording full desktop activities as the demonstrations.
Switch capture mode from DirectShow to Desktop -> set a frame rate value manually. To guarantee a smooth recording, you are suggested to increase frame rate to a value between 20 and 30, both of them included. If you are doing a gameplay recording, maybe 60 fps is better.
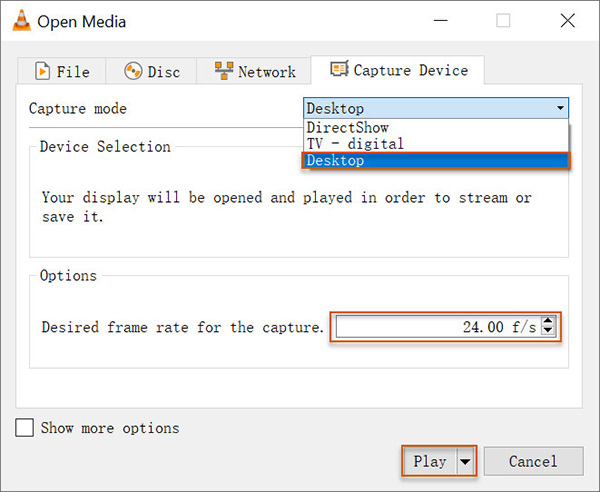
After that, you can click Play to stream the content on VLC, or click “Convert” to set for output video format, encoding methods, resolution, saving name and destination etc. (Check is it necessary to convert recording?)
Step 4. Start Recording
As is mentioned in Step 1, there are two methods to show up recording control. So, tap record button or right lick record option on either of them to begin the capture. When the content comes to an end, press stop button or right click stop option to finish the process.
Then, you can check your final video in the saving folder. Be aware that if you didn’t click “Convert” to set for conversion or destination folder, the raw recording footage will located at C:\Users\Administrator\Videos\.
Part Two: Best VLC Capture Device Alternative Software
For VLC fans, it’s a pleasure to dig into its recondite recording feature. But for those who take it too complex to record or are annoying with VLC capture device troubles, it’s a wise choice to turn to another dedicated screen recorder. Here RecMaster is our recommendation. For one thing, it delivers a more intuitive interface and easier settings. For another, the five recording modes make it possible to capture whatever actions and audios at will. >>Check RecMaster Review
Step 1. Free download, install and launch RecMaster.
Step 2. Choose a recording mode and set for output video. You are free to adjust video format, recording quality, frame rate, whether to record webcam/system sound/microphone at the same time or not, whether to show watermark/mouse cursor or not. Better still, you can schedule a future screencasting task from software to start the capture automatically.
Step 3. Click REC button to recording. During the process, you can take annotation by drawing, texting, highlighting etc.
Step 4. Stop the recording once it goes to an end. Edit and upload it online with RecMaster if necessary.
Part Three: Tips & Tricks, FAQs on VLC Capture Screen
It doesn’t seem hard to do screen recording with VLC, ah? However, you may come across some errors or dilemmas for various reasons. The following part gives you some VLC screen recording advices and troubleshooting tips.
Q: Is it necessary to do convert settings before recording (in Step 2)?
Although it’s not a must-do in Step 2, we still recommend you to click the “Convert” dropdown option for two reasons:
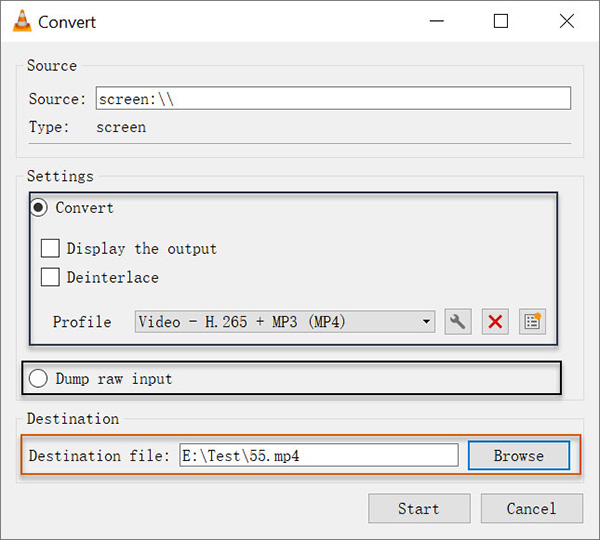
– For users who need to capture video in a specific format or codec, click to open Convert window and choose an output profile. VLC supports a wide range of outputs such as H.265 or H.264 MP4/MOV/MKV, DIVX AVI, VP8 WebM and FLV. Also, you can change resolution and apply certain filter effect into recording under Convert settings.
– For users who don’t want do video conversion and only need to customize the capture name and saving path, do tick “Dump raw input” and then realize it in the bottom part.
Q: What if your VLC Capture Device not working or crashes?
Firstly, you can close your Windows Defender to have a try. And in most cases, it happens due to your maloperation or software bug. You can export the log file to seek help for VLC forum or support.
Q: Where’s my video capture? After recording desktop with VLC, I can’t find my file and have no clue on where is it…
According to your description, it’s easy to draw that you didn’t set for destination name and folder before recording. In this case, the recorded file is placed in This PC -> Videos and its name starts with “vlc-record-2019… (recording date & time)”.
If you need to set destination folder for recording, after you click “Open Capture Device” to set a device, you must click “Convert” to access to the Convert panel with destination setting at the bottom.
Q: Why my VLC recorded video is unplayable?
I have to say, the causes vary from situations. If you open video with “Movies & TV” and get a “Can’t play” error message with code like oxc10100be, oxc10100bf and similar, your file may be encoded with a player unfriendly codec, have a wrong extension or is broken. At this time, you’d better play it with another player, transcode the file with VLC or HandBrake (an open-source video converter). If it fails to play anyway, fix it with repair tool or re-capture the content again with a VLC alternative recorder.
Sometimes it’s the improper output video settings that lead to (black screen) playback problem. You can go to Tools -> Preferences -> Video and change the output mode.
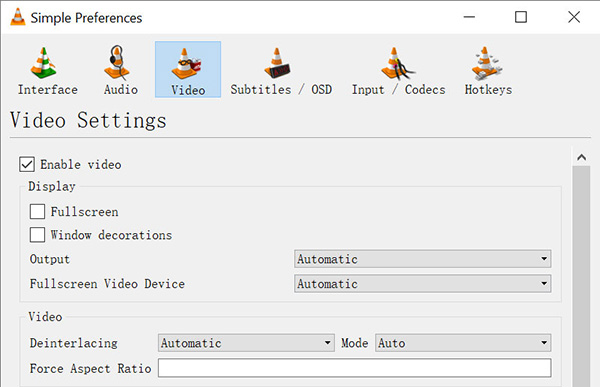
Since RV3, the raw format of VLC recorded video, is not friendly to video software, you are supported to output converted video while recording.
Q: How to hide mouse cursor when screen recording with VLC? / Why my mouse pointer has gone?
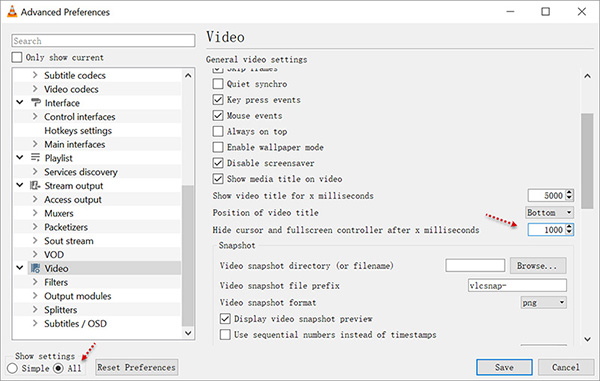
Under Tools –> Preferences, you can adjust the “Hide cursor and fullscreen controller…” value to hide or display the cursor. The cursor image is also changeable under Inputs & Codecs -> Access modules -> Screen -> Mouse pointer image in this panel. It can’t be ruled out that software bug is the root of cursor problems.
Q: Why there’s no sound in my VLC captured video?
This is also a complicated matter. Firstly, you should make sure you are using the latest VLC version, the source audio is available and enabled. Then you can walk through and alter audio preferences settings such as output module and device. For more troubleshooting methods, pleas check how to fix screen recording has no sound.
Related Guide:
How to Record Streaming Content with VLC
How to Screen Record Windows Media Player

RecMaster
Screen recording made easy.
Record every moment on your PC or Mac within few clicks.
Download Download-
How to Screen Record Final Fantasy 7 Rebirth On PC?
-
How to Record Signal Calls on Windows and Mac?
-
How to Record Screen on Gateway Desktop?
-
How to Record Webcam in 9:16 Aspect Ratio on PC?
-
How to Screen Record Flash Games?
-
How Do I Record in 1080 x 1920 Dimensions on PC?
-
Can I Record a Meeting While Wearing Headphones on Computer?
-
Deleted the Wrong Video
-
How to Set Passwords for RecMaster with My Lockbox?
-
How to Screen Record on an ASUS VivoBook Laptop?
-
How to Record Black Myth: Wukong?
-
How to Record Filmzie on PC and Mac?
-
How to Create New Employee Onboarding Videos with RecMaster?
-
How to Make A Product Demo Video with A Screen Recorder

RecMaster – Record Every Moment on Your Computer Screen
Record 1080p or even 4K clips at 60fps to maintain the high quality still.
Flexible settings for mouse cursor effects, watermark and annotations.
Preloaded with recording scheduler, video editor. Allow one-click sharing.
Related & Hot Articles
Subscribe to keep up with the latest software discounts , news, and updates.


